Showing posts with label bag. Show all posts

Saturday, November 11, 2017

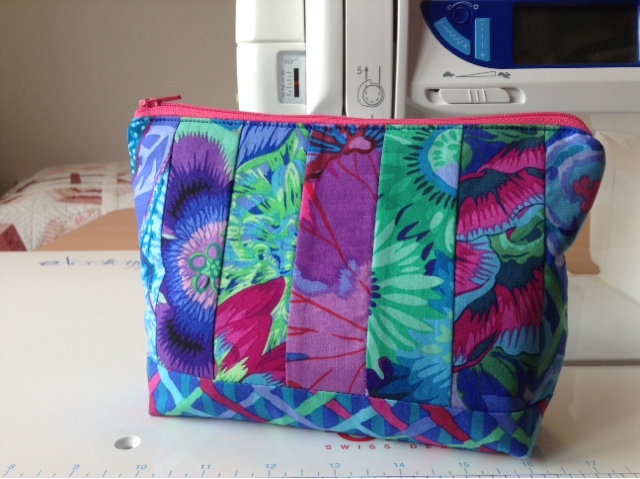
Kaffe Fassett Pouch Bag


When you need a half hour break from writing reports, what better than to grab a little kitset?


Bought the kit, with ready cut pieces, from a stall (can't remember which one) at the National Quilt Symposium in October. Thought it was a nice little introduction to using some Kaffe Fassett fabrics.


Is about 8.5" wide and 5.5" tall. Just right for holding my slowly-developing collection of machine embroidery threads.

Joining up with Amanda Jean's Finish It Up Friday

Friday, September 2, 2016

Tote bags #8 and #9

The last two in my series of tote-bags, this time using some cool Paris-themed fabric...


This bag has a red strap and a teal strap.

This bag has two teal straps.

The free Coates pattern is so easy to make...I made all of these over a period of about three weeks.

A warm Spring hello to all those visiting via Kelly's Needle and Thread Thursday! And a sunny Spring hello to my friends visiting via Crazy Mom Quilts' Finish It Up Friday!

Tote bags #5, #6, #7

More in my 'series' of tote bags with the Coates pattern that I was making use of - super quick and easy!

This time the bags were based on a couple of pretty teal fabrics that I had in my stash...


Hello out there to all those visiting via Kelly's Needle and Thread Thursday! And a sunny Spring hello to my friends visiting via Crazy Mom Quilts' Finish It Up Friday!

Tote Bags #3 and #4

Another couple of bags made with the free pattern from Coates...

this time in two different floral fabrics, both with a dark navy solid as contrast...


This bag has a lovely navy on white floral.
The design has an exterior pocket on each side.

This bag is based on a lovely Oriental tea-plate floral.


My aunt had asked for me to make a bag for her friend (so by having nine made, she had a good selection to choose from) and Isabelle chose the Oriental floral, (my aunt then chose one for herself as she just couldn't resist!)

A sunny Spring hello to my friends visiting via Crazy Mom Quilts' Finish It Up Friday!

Tote Bag #2

I enjoyed making the first easy tote bag so much that I went on a roll and made eight more using the same pattern from Coates but with different fabrics from my stash (plus just a few solids that I had to purchase as blender fabrics)...

...here's the butterfly bag...


My aunt had asked me to create a bag for a friend of hers, but I had no particular colour requested, so I made a whole heap of bags so she would have plenty to choose from.

A sunny Spring hello to my friends visiting via Crazy Mom Quilts' Finish It Up Friday!

Sunday, July 31, 2016

Three French Hens tote bag


This was a really quick and easy project from my Finish Along 3rd Quarter goals, perfect for a snowy winter late afternoon/evening inside by the fire.


I adapted the free Pocket Tote pattern from Make It Coats - I used five fat quarters and some yardage of a blue gingham and a red solid - it took a little bit of extra maths but still came together quickly.


The feature fabric is a mash-up of lovely illustrations and graphics based on the song 'The Twelve Days of Christmas' and I love the three French hens that are shown (perhaps due to having a little collection of hens out in the backyard!)


The outside of the bag has pockets and it measures about 10" x 12" so is a nice size without being too bulky. I used dark aqua for the inner lining, and an aqua gingham for the pocket linings. The contrast fabric on the exterior is a deep grey colour that looks almost like a dark chocolate from some angles.


My dear Aunty Blanche had asked me to make a bag for her friend, so I have actually made nine bags for her to choose from (see the next posts to see the other bags) - my Aunt chose this bag for herself after Isabelle chose the one she wanted.


Huge "hello" to my quilting friends visiting via Kelly's Needle and Thread Thursday!

Friday, December 25, 2015

Tudor Bag for Lorena


I used the Sara Lawson (Sew Sweetness website) pattern for her Tudor Bag (that I won as part of a prize from one of the Finish Along quarters of this year) to make this bag for my mum for Christmas...  

- she had asked for a bag with short handles and this was a good chance to try out this pattern. It was my first time adding a zip pocket on the front and a zip placket at the top. I have also never used stiff Soft and Stable foam as wadding (it's just so expensive here...)


There are four inner pockets, attached to the lining....


It was a slightly more difficult construction method from my usual style of bag but I managed to put it altogether in a couple of days (in between Christmas shopping/chores)...phew!


3rd Jan 2016: HAPPY NEW YEAR everyone! Have just returned from a wonderfully hot, full-of-fun and laughs camping holiday at Te Anau, just in time to link up with Crazy Mom Quilts' Finish It Up Friday linky party - have a super 2016 y'all!


Saturday, November 28, 2015

5-0 Bag for Wendy


One of my lovely workmates has just celebrated a significant birthday, so I have whipped this up this morning to gift to her when I head over to her house for a small celebration tonight...
Side A
It is made with squares from a charm pack set of Weeds by Me and My Sister Designs for Moda (has been in my stash for a year or so) plus some black and grey fabrics also from my stash...
Side B
It is approx 11" x 14" and has a small pocket sewn to the lining. I loosely based it on a pattern I have used before, called Bird Aviary, by Judith Tetley, printed in Handmade magazine Vol 27 No8 2010.
We've had lots of rain and hail this morning, but the sun came out just as I finished the bag...
Rumbles got off the sofa to come and schmooze outside...

And then of course Bess had to get in on the photos too...

Big "hello" to followers and visitors from Crazy Mom's Finish It Up Friday linky party! Have a nice weekend everyone!

Saturday, September 26, 2015

Tote Bag tutorial


For a quick, basic, lined bag, with a feature fabric on one side and strips of prints on the other, this is what I do:

1. Cut one panel of 16" x 18"

2. Cut 16" length strips of even width, or mixed widths depending on the effect I wish to create, eg between 1.5"-4", cutting enough to make a 16" x 18" panel when sewn together. 

3. Layer each panel with batting (and a muslin backing if wish) and quilt as you like.


4. Trim both panels to 15" x 17". Place right sides together and stitch 1/4" or 1/2" seam around the sides and bottom. 

5. Make a gusset so the bag has a flat base: flatten the sides of the bag so that the side seam rests against the base seam and form a triangle.  Sew 1 and 1/4" across the point (I usually do it three times) then trim the point off. Repeat on other seam. 


6. Cut lining fabric 17.5" x 15.5" (two pieces or cut on the fold). With right sides together, sew the side seams and bottom, leaving a four inch gap in the bottom for turning the bag later.  

7. Make a gusset in the lining, as in steps 5 and 6.  

8. Make handles for the bag, choose desired length - mine is usually about 28" (pre-sewing). For two-colour handles: cut two strips of each colour, 2.5" x 28". Press a 1/4" fold along the length of both sides, of each strip. 

9.  Cut batting of 1.5" x 28". Wrap first colour around the batting, then layer other colour on top to make a sandwich. Sew 1/8" along each edge (or closer if possible) and also sew a strip right down the middle of each handle. 

10. Attach handles to the outside of the bag and pin in place, keeping the pins away from the upper edge). Stitch 1/4" from the top edge, triple stitching for reinforcing. 

11. Insert the bag outer into the lining so that the right sides are together and the handles are tucked down out of the way.  Stitch 1/4" around the top, reinforcing over the handles and side seams. 

12. Carefully pull the quilted bag through from the inside by using the gap in the base of the lining. Fold the top down and slip-stitch the gap closed. 

13.  Top stitch around the upper hem of the bag, holding handles up out of the way. 

The bag is finished, remember to date/label it somewhere!